Customizing the JupyterHub environment (TLJH)
This page describes how to set up your JupyterHub environment for The Littlest JupyterHub (TLJH) pathway.
A lot of the information on this page can be found within the TLJH Guide, specifically within the How-To Guides and Topic Guides.
Deploying a change to your JupyterHub configuration
First things first, to make changes to your JupyterHub configuration, you need to know how to deploy those changes. This section covers how to deploy a change with the commandline program tljh-config.
All modifications to the base JupyterHub deployment are made with changes to this tljh-config program.
Running tljh-config
You can run tljh-config in two ways:
From inside a terminal in JupyterHub while logged in as an admin user. This method is recommended.
By directly calling
/opt/tljh/hub/bin/tljh-configas root when logged in to the server via other means (such as SSH). This is an advanced use case, and not covered much in this guide.
Set / Unset a configuration property
TLJH’s configuration is organized in a nested tree structure. You can set a particular property with the following command:
sudo tljh-config set <property-path> <value>
where:
<property-path>is a dot-separated path to the property you want to set.<value>is the value you want to set the property to.
This can only set string and numerical properties, not lists.
To unset a configuration property you can use the following command:
sudo tljh-config unset <property-path>
Unsetting a configuration property removes the property from the configuration file. If what you want is only to change the property’s value, you should use set and overwrite it with the desired value.
Reloading JupyterHub to apply configuration
After modifying the configuration, you need to reload JupyterHub for it to take effect. You can do so with:
sudo tljh-config reload
This should not affect any running users. The JupyterHub will be restarted and loaded with the new configuration.
Comparison with Kubernetes deployment: config.yaml
tljh-config is a simple program that modifies the contents of the config.yaml file located at /opt/tljh/config/config.yaml. tljh-config is the recommended method of editing / viewing configuration since editing YAML by hand in a terminal text editor is a large source of errors.
Customizing your Hub environment
The environment provided to your students is defined by the installer, which can be customized to fit your needs with packages and plugins. The installer can be customized with commandline parameters. The default installer is executed as:
curl https://raw.githubusercontent.com/jupyterhub/the-littlest-jupyterhub/master/bootstrap/bootstrap.py \
 | sudo python3 - \
   <parameters>
Installing Python packages in the user environment
--user-requirements-txt-url <url-to-requirements.txt> installs packages specified in the requirements.txt located at the given URL into the user environment at install time. This is very useful when you want to set up a hub with a particular user environment in one go.
For example, to install the latest requirements to run UC Berkeley’s data8 course in your new hub, you would run:
curl https://raw.githubusercontent.com/jupyterhub/the-littlest-jupyterhub/master/bootstrap/bootstrap.py \
 | sudo python3 - \
   --user-requirements-txt-url https://raw.githubusercontent.com/data-8/materials-sp18/master/requirements.txt
The URL must point to a working requirements.txt. If there are any errors, the installation will fail.
Installing TLJH plugins
The Littlest JupyterHub can install additional plugins that provide additional features. They are most commonly used to install a particular stack - such as the PANGEO Stack for earth sciences research, a stack for a particular class, etc.
--plugin <plugin-to-install> installs and activates a plugin. You can pass it however many times you want. Since plugins are distributed as python packages, <plugin-to-install> can be anything that can be passed to pip install - plugin-name-on-pypi==<version> and git+https://github.com/user/repo@tag are the most popular ones. Specifying a version or tag is highly recommended.
For example, to install the PANGEO Plugin version 0.1 in your new TLJH install, you would use:
curl https://raw.githubusercontent.com/jupyterhub/the-littlest-jupyterhub/master/bootstrap/bootstrap.py \
 | sudo python3 - \
   --plugin git+https://github.com/yuvipanda/tljh-pangeo@v0.1
Modify the resources available to your users
To configure the resources that are available to your users (such as RAM, CPU and Disk Space), see the section User Limits. For information on resizing the environment available to users after you’ve created your JupyterHub, see Resize the resources available to your JupyterHub.
User Server Limits
limits.memorySpecifies the maximum memory that can be used by each individual user. By default there is no memory limit. The limit can be specified as an absolute byte value. You can use the suffixes K, M, G or T to mean Kilobyte, Megabyte, Gigabyte or Terabyte respectively. Setting it toNonedisables memory limits.sudo tljh-config set limits.memory 4GEven if you want individual users to use as much memory as possible, it is still good practice to set a memory limit of 80-90% of total physical memory. This prevents one user from being able to single handedly take down the machine accidentally by OOMing it.
limits.cpuA float representing the total CPU-cores each user can use. By default there is no CPU limit. 1 represents one full CPU, 4 represents 4 full CPUs, 0.5 represents half of one CPU, etc. This value is ultimately converted to a percentage and rounded down to the nearest integer percentage, i.e. 1.5 is converted to 150%, 0.125 is converted to 12%, etc. Setting it toNonedisables CPU limits.sudo tljh-config set limits.cpu 2
Resize the resources available to your JupyterHub
As you are using your JupyterHub, you may need to increase or decrease the amount of resources allocated to your TLJH install. The kinds of resources that can be allocated, as well as the process to do so, will depend on the provider / interface for your VM. We recommend consulting the installation page for your provider for more information. This page covers the steps your should take on your JupyterHub after you’ve reallocated resources on the cloud provider of your choice.
Currently there are instructions to resize your resources on the following providers:
Once resources have been reallocated, you must tell TLJH to make use of these resources, and verify that the resources have become available.
Verifying a Resize
Once you have resized your server, tell the JupyterHub to make use of these new resources. To accomplish this, follow the instructions in Configuring TLJH with tljh-config to set new memory or CPU limits and reload the hub. This can be completed using the terminal in the JupyterHub (or via SSH-ing into your VM and using this terminal).
TLJH configuration options can be verified by viewing the tljh-config output.
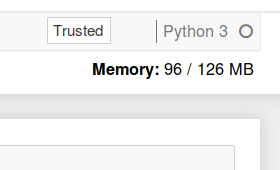
sudo tljh-config showDouble-check that your changes are reflected in the output.To verify changes to memory, confirm that it worked by starting a new server (if you had one previously running, click “Control Panel -> Stop My Server” to shut down your active server first), opening a notebook, and checking the value of the nbresuse extension in the upper-right.
To verify changes to CPU, use the
nprocfrom a terminal. This command displays the number of available cores, and should be equal to the number of cores you selected in your provider’s interface.nproc --allTo verify currently-available disk space, use the
dfcommand in a terminal. This shows how much disk space is available. The-hTargument allows us to have this printed in a human readable format, and condenses the output to show one storage volume. Note that currently you cannot change the disk space on a per-user basis.df -hT /home
Authorization for your hub
Authorization allows you to control who has access to your JupyterHub, as well as keep track of who is accessing the hub.
There are many options for authorization with JupyterHub. The Data 8 deployment uses the Berkeley CalNet authentication system, which is part of the Google “G Suite”. Your authentication approach depends on how your university authenticates. You can also choose authentication with popular services like GitHub.
See the TLJH Authentication Guide for information about various authentication options and how to enable them.
For this guide, we’ll show you how to authenticate using GitHub usernames, as this is a free service that is more widely-accessible than the particular authentication system that any one university uses.
Authenticating with GitHub
To authenticate with GitHub, take the following the steps outlined in the TLJH Github Authentication Guide.
Note: The DSEP authorization configuration can be found here.
Adding admin users
--admin <username>:<password> adds user <username> to JupyterHub as an admin user and sets its password to be <password>. Although it is not recommended, it is possible to only set the admin username at this point and set the admin password after the installation.
Also, the --admin flag can be repeated multiple times. For example, to add admin-user1 and admin-user2 as admins when installing, depending if you would like to set their passwords during install you would:
set
admin-user1with passwordpassword-user1andadmin-user2withpassword-user2using:curl https://raw.githubusercontent.com/jupyterhub/the-littlest-jupyterhub/master/bootstrap/bootstrap.py \ | sudo python3 - \ --admin admin-user1:password-user1 --admin admin-user2:password-user2set
admin-user1andadmin-user2to be admins, without any passwords at this stage, using:curl https://raw.githubusercontent.com/jupyterhub/the-littlest-jupyterhub/master/bootstrap/bootstrap.py \ | sudo python3 - \ --admin admin-user1 --admin admin-user2set
admin-user1with passwordpassword-user1andadmin-user2with no password at this stage using:curl https://raw.githubusercontent.com/jupyterhub/the-littlest-jupyterhub/master/bootstrap/bootstrap.py \ | sudo python3 - \ --admin admin-user1:password-user1 --admin admin-user2
Confirm that your environment works
To confirm that you’re running the correct environment needed for Data 8, take the following steps:
Go to your JupyterHub’s public IP address.
Log in with your username/password (if you haven’t logged in yet, use whatever username/password you’d like)
Click “Start My Server”, then create a new Jupyter Notebook.
Run the following Python code import datascience print(datascience.version)
You should see the version for the datascience package printed below the cell. If this worked, then congratulations! Your JupyterHub is ready to go.